
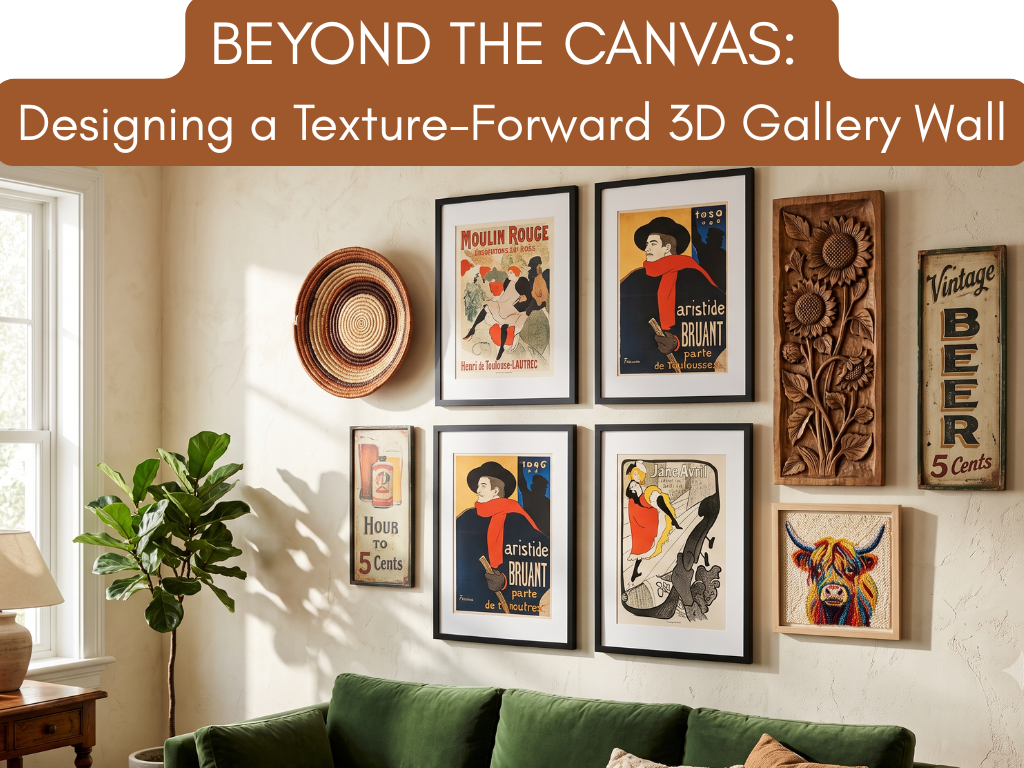
We have all seen—and probably built—the standard gallery wall: a neat, orderly grid of matching flat frames lined up across a living room or entryway. While traditional gallery walls can be beautiful, they can also start to feel a bit flat, predictable, and museum-sterile over time.
If you are a maximalist, a vintage collector, or simply someone who loves spaces filled with warmth and character, why limit your walls to two dimensions?
The secret to a showstopping, magazine-worthy feature wall isn’t just about what you frame—it is about depth, shadow, and texture. By mixing traditional framed artwork with three-dimensional objects like woven baskets, architectural wood carvings, and sculptural vintage signs, you transform a flat wall into a dynamic, living art installation.
Here is how to design a texture-forward 3D gallery wall, featuring five distinct pieces from the archives to show you how to layer flat and sculptural decor like an interior designer.

🛑 Why Traditional Gallery Walls Fall Flat
When every piece on a wall shares the exact same depth, glass reflectivity, and rectangular shape, the human eye processes the entire arrangement as one flat block.
By introducing three-dimensional objects, you create natural shadows that change throughout the day as natural light moves across the room. Sculptural elements break up the rigid geometry of standard picture frames, adding warmth, movement, and a collected-over-time storytelling quality that flat prints simply cannot replicate.
📐 The 4 Rules for Building a 3D Gallery Wall
You don’t need to throw out your favorite framed prints to go 3D! The magic happens in the contrast between flat artwork and sculptural relief. Here is how to build your wall step-by-step using five curated shop favorites:
1. Anchor the Arrangement with Classic Flat Art
Every great gallery wall needs a foundation. Start by hanging your traditional framed art at eye level to establish your overall color palette and serve as the visual anchor.
- The Shop Pick: Set Of 4 Framed and Matted Lithograph Prints by Henri de Toulouse-Lautrec
- Why It Works: Classic lithographs provide that timeless, vintage art-gallery aesthetic. Using a framed set gives your layout an immediate sense of structure and elegance. Once your flat frames are placed, you can use the negative space around them to introduce unexpected 3D textures.
2. Break the Grid with Circular, Woven Textures
The biggest culprit behind a stiff gallery wall is an overdose of sharp 90-degree corners. To soften rectangular frames, introduce a circular shape made from natural, organic fibers.
- The Shop Pick: Handwoven Coiled Raffia Basket, Three-Color Design, 12″, Wall Art Or Tabletop
- Why It Works: Hanging a woven basket directly beside a glass-front frame creates instant visual magic. The matte, tactile coils of the raffia absorb light rather than reflecting it, while the round silhouette breaks up the boxy lines of traditional frames.
3. Add Architectural Depth with Hand-Carved Wood
To make a gallery wall feel truly three-dimensional, you need an object with significant depth and high-relief carving that casts real shadows against the drywall.
- The Shop Pick: Handcarved Wooden Floral Wall Art With 3 Large Sunflowers, Made In Honduras 20×9″
- Why It Works: This large, 20-inch vertical carving brings architectural weight and earthy warmth to the arrangement. Because the sunflower blossoms are carved in deep relief, they physically reach out into the room, creating dramatic shadows that shift with your lighting.
4. Work in Quirky, Vertical Conversational Pieces
Don’t be afraid to add a playful, conversational element that reflects your personal hobbies or humor! Narrow, vertical 3D plaques are also the ultimate secret weapon for filling awkward gaps between wider frames.
- The Shop Pick: Vintage Chalkware Wall Sign For Pub Bar Mancave “BEER” 5 Cents. MCM
- Why It Works: Mid-century chalkware has a fantastic, solid sculptural presence. A long, narrow sign acts as a vertical divider on your wall, while the retro lettering and embossed 3D detailing keep the gallery wall feeling relaxed, eclectic, and fun.
5. Bridge the Gap with Tactile Fiber Art
If jumping straight from a glass-front frame to a chunky wood carving feels too abrupt, use textile art to bridge the gap between “flat art” and “sculptural object.”
- The Shop Pick: Embroidered Textile Art Of Highland Cow, Colorful Punch Needle Portrait 7×9″
- Why It Works: Punch-needle and embroidered art sit inside a traditional frame silhouette, but the artwork itself is made of soft, raised yarn loops. It gives you the familiar structure of a framed picture while adding that cozy, touchable fiber texture to your arrangement.
🎨 How to Lay It Out Without Making Holes
Before you reach for the hammer and nails, follow this simple designer layout trick:
- Trace Your Items: Lay a roll of kraft paper or wrapping paper on the floor and trace the outline of each item—both your flat frames and your 3D objects.
- Cut & Tape: Cut out the paper templates and use painter’s tape to arrange them on your wall.
- Check Your Spacing: Because 3D items stick out from the wall, leave roughly 3 to 4 inches of negative space between pieces so your baskets and carvings don’t visually crowd your flat frames.
- Step Back: Once your layout feels balanced—with wood tones, circular shapes, and flat frames evenly distributed—hammer your nails right through the paper templates and tear the paper away!
The Design Takeaway: Your walls should be a reflection of the things you love to touch, collect, and admire—not just what fits inside a standard 8×10 mat. Mix your favorite prints with carved wood, woven raffia, and vintage sculptures to build a wall that pops from every angle!
What is the most unusual 3D object you have ever hung on your walls? Tell me about your favorite eclectic finds in the comments!
Leave a Reply